|
How to make Toy Theaters |
|
How to make Toy Theaters |
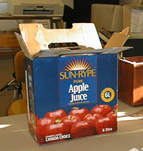
| Here's how my first Toy Theatre started out! These large juice boxes are an excellent choice because they are made of very sturdy cardboard and they are the just the right shape for one of these creations! |
|
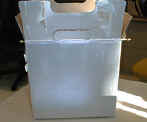
| I took my apple box outside on a sunny day and gave it a few good coats of silver spray paint. It's important to completely paint whatever box you're using as it gives a nice blank canvas to work with. I later wished I'd spray painted the inside too . . . next time! |
|
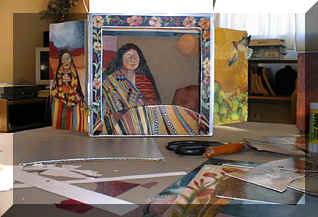
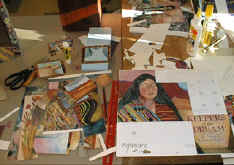
| I had an outdated calendar with artwork by Patricia Wyatt called Keepers of the Dream. Patricia creates a new 'Keepers of the Dream' Calendar every year. I hadn't discarded the calendar because the artwork was so beautiful and I knew one day I would find some use for it. I enjoy working with first nations legends so it was perfect! |
|
|
There are
all sorts of things you can use to create your Story Box or Toy
Theatre. At Yahk Elementary School, our Drama Club created
Christmas Theme Toy Theatres. Working with a theme
like Christmas, the raw materials are easy to gather. Use old
Christmas cards, wrapping paper, magazines and especially, your
imagination!
Computers
are also a great way to create your own artwork or you could search
the internet for free clipart and images to print out and collage
onto your Toy Theatre.
|
|
So, you've
painted your box, and assembled your supplies. Now it's time
to decide what shape your 'stage front' will be. I used my
collage material as a guide, glued a border on the front of the box
and cut that shape out of the front of my apple box. I cut it
out carefully so that the front piece could be used later as a
'curtain'.
Next, cut
out a whole bunch of images that fit your theme. Cut out more
than you think you'll use. It's nice to have lots of bits and
pieces to work with. The cutting out is an important part of
your project. Cut carefully and neatly. It'll make a big
difference to your finished theatre.
Decorate the
exterior of your theatre making sure you glue the pieces on really
well.
The next
step is to create your theater interior ~ your stage!
For your story or play you will want to make scenery drops,
backgrounds and character slides. |
|
|
|
Contact Nicola Finch |
| Check
out the toy
theatre links on this page for
wonderful ideas and free downloads to print and use. Have a good
look around when you get there ~ it's well worth the time.
This page was originally created especially for the members of the Yahk Elementary School Noon Hour Drama Club ~ Luke, Rita, Cynthia, Rachel, Shauna, Tyler, Rebecca and Stephen in 2001.
|
|